
Scarecrow Trail Tales- Behind the scenes to making a Roald Dahl
When we moved to our home several years ago it didn’t take us long to realise that this little Yorkshire village was more than just a place to live but a wonderful community full of activities for anyone who wanted to get involved.
As well as the WI, art group and other groups you might expect, an annual village fair was in place which over the years has grown into a 3 day ‘festival’ of events from hill running, well dressings to live music and …a Scarecrow trail.
Now if you’ve never been to a Scarecrow Trail, I really do recommend it, its such fun for all ages and is often free. It can be a long walk but for anyone not able to walk that far, there’s no reason you can’t go around by car as most can be seen from the roadside.
For our village, a theme is picked each year, residents can register a scarecrow and a map is then produced and sold at a small cost which visitors can buy on the day to help them locate the scarecrows but also to allow them to enter the competition should they wish to. Then its all about going around spotting the scarecrows, writing down who you think they are and submitting your entry for a chance to win a little something whilst nominating your favourite scarecrow in the process!
The variety, size and quality of entries are all so different but all wonderful…oh how we’ve laughed over the years, been wowed at the genius and creativity (a scene from the film ‘Up’ with the balloons quite remarkable) and of course wracked our brains and had to play detective as to what some of them are if we didn’t know the topic very well. Its great for testing the old grey matter!
Now, we’ve always meant to join in and make a scarecrow but it always ends up creeping up on us and we’ve no time to do it, particularly if I’ve been helping with the well dressings that year, however this year was a different story and whilst there was only 10 days to go, hubby and I committed to having a go.
The theme…Roald Dahl!
This wonderful theme is of course so extensive …lots of characters could be made (matilda, bfg, the twits, esio trot etc) but we decided to pay tribute to the man himself, Roald Dahl, as we just felt this might be something different and would hopefully get people thinking who he was!
Now being complete beginners, it did all seem a little daunting particularly how to weather proof things, given that rain or sun, our efforts needed to survive outside for a minimum of 2 days but ideally for 7. So we sought advice from a friend in the village that had experience and then used common sense for everything else including how to ensure that given we live on a hill and it’s always windy, that it stayed put! (And I can confirm that what we did worked, as it looked absolutely fresh as a daisy until we took it down)
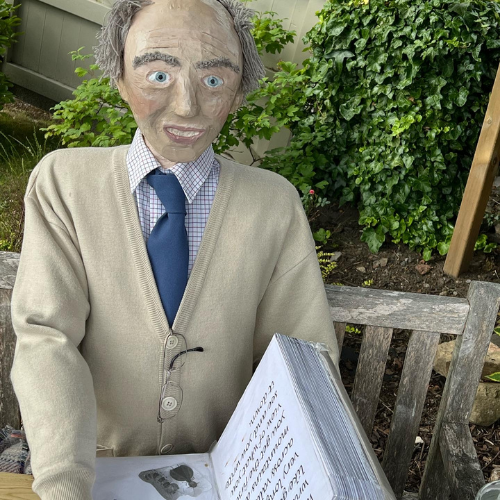
And so with so many ideas, some rather grand that we simply didn’t even dare attempt, some (interactive ones for the kids) we didn’t have time for, it was time to get on with it…10 days was not a long time to create something either of us would be happy to put out , so eating, breathing, sleeping it and getting take out for tea most nights after work was definitely on the cards but we did it….and here it is complete! Mr Roald Dahl himself!
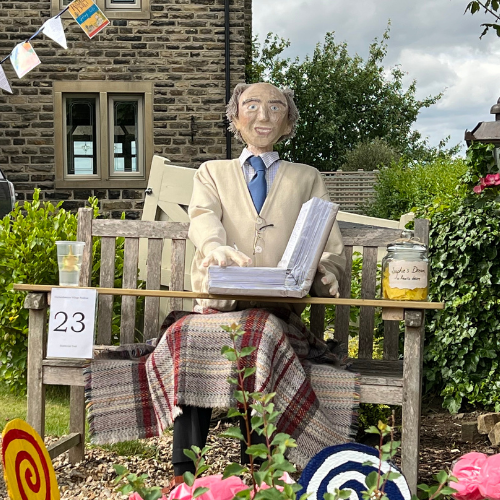
I hope you like him! It wasn’t easy to get any likeness…I’m a gift wrapper for a living not a painter but I certainly did my best in the time I had to paint his face …Trust me I redid parts of it several times as his eyes at one point were a bit piercing and I certainly wasn’t after scaring small children!
Thankfully they and the adults seemed to like the finished version, most taking pictures of him and some with him! And we found out later we’d been voted for too…getting first prize! Wow, we were just blown away! (thankfully just us, Roald, stayed put which was handy!!)
My (engineering headed) hubby was the genius behind the body, making a wooden and tubing body with bendable arms and legs that we can use again and again should we wish to…I did say that given the amount of work we may only enter once every 3 years but when you do one, now from experience, I can confirm that there’s a real danger you’ll get the bug and get itching to do another! Particularly when you see the faces of the little ones light up all interested and curious!
Now of course we didn’t just do Mr Roald Dahl….Oh no! (I really don’t make it easy for myself do I?) No, I had had this vision to make reference to some of his books and tell a story with the ‘set’ we were creating, so the scene was designed to be him writing in a book, a quote we’d seen on a picture at the Roald Dahl Museum about him going walking and writing down what he sees.
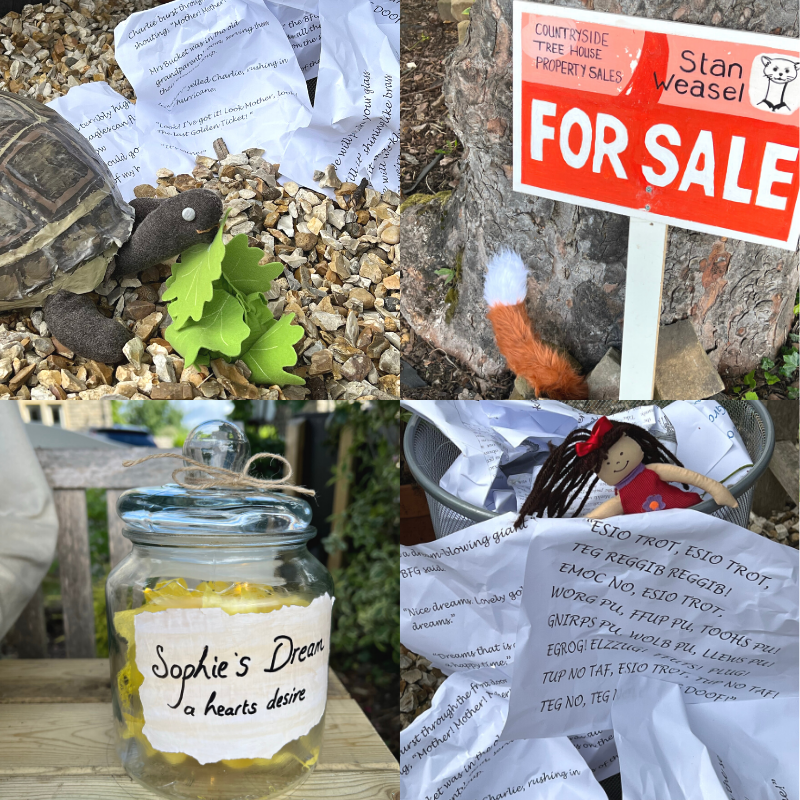
So we had an old litter bin with some (fake) pages torn out of his (fake) book and them spilling out and turning into his stories…with a model of a tortoise (for esio trot) , a little girl with a ribbon in her hair (matilda), newt in a glass of water (matilda the movie), Sophies dream jar (complete with battery lights that twinkled inside) (BFG), sweets (Charlie and the Chocolate Factory) and a Tree House for sale sign and foxes tail (Fantastic Mr Fox)….Lots of clues for anyone not sure who he was and extra bits for the kids to recognise.
Here’s some pics….
Now to anyone interested in some of the materials used and how things were made waterproof, here’s a brief guide. Any questions you have do post in the comments below and we’ll try to answer them but do bare in mind this was a first attempt and we feel sure there are many ways it could be done.
We did some experimenting and learning on the job for sure and important to note that we used/reused things we already had here at home, from cardboard postal tubes we no longer needed to a pair of old thermal tights we once bought for a biking holiday but never needed…see that hoarding does come in handy ha ha! Oh and we borrowed some of his clothes (thanks Dad!). We were very determined not to purchase anything unless we had to! Indeed I think overall we spent £12 on bits we simply couldn’t do without and felt necessary to buy that we wouldn’t use again but we will be donating these things to charity so win win.
The making of the head….
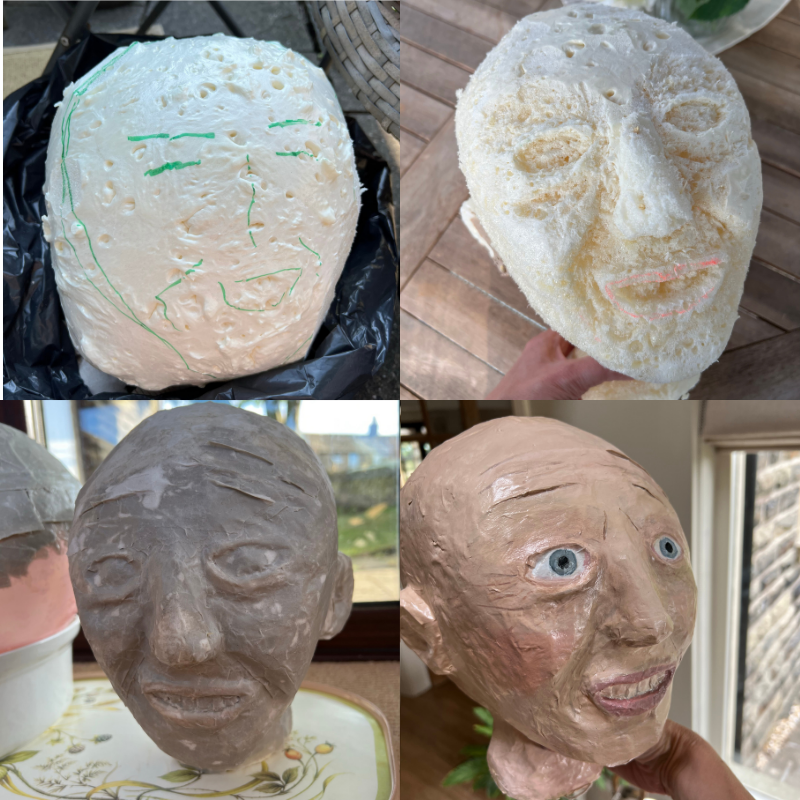
I was all for the papier mache over a balloon approach but hubby thought we’d try some expanding foam we had left over in the garage and he simply pumped it into a box and let it expand into a square piece! I then was given the task of chiselling this out with a sharp knife (I did this very carefully and outdoors so as not to breathe any small pieces in but would recommend if you wish to try this you do more research beforehand if this is safe to do). It also did quite take some time, using a sharp knife and it didn’t go completely to plan…At one point I did think to ask if we could change the theme to Dr Who baddies as it was clear it was still wet in the middle and it began to leak out of a hole! So I left it to dry and came back to it. We did still then have to do papier mache over the top but less layers. (I used the PVA glue method but did at one point resort to the old fashioned flour method as this seemed to hold paper down better!)
Once dry it was painted with some acrylic paints (lots of mixing colours to get the right shades) then made weatherproof with wood varnish!
The Hair and eyebrows…
Well I tried to get in front by doing it as one of the first things (on a lovely sunny day outside soaking up the sun at the same time…well you gotta get that vitamin D!) using decorators tape dyed brown with diluted coffee, adding brown wool and hand sewing but at the last minute decided the wool was the wrong colour so have saved this for another time. So, as time was tight, I tried another method, sewing a more grey coloured wool onto an old piece of brown material using the sewing machine which worked a treat and was so speedy! Then I glued the pieces on him with a hot glue gun. The eyebrows I plaited wool, pulled bits through with a crochet hook and then snipped to have straggly bits cos whilst i’ve no idea if RD had straggly eyebrows i’ve never met a man over 60 that hasn’t lol! Sorry but I haven’t!
The Hands and Limbs…
Hands are white cotton gloves I had left over from a high end gift wrapping job! (yes we always glove up if it’s precious cargo!) I simply then made a cuppa (like you do…a girl has to keep hydrated!) and popped them and the used tea bag in a bucket and dried on the line! Then painted the nails on with my natural nail polish and filled them with anything out the waste paper basket! The limbs…these were already on the body that hubby made but I padded them out with cylindrical postal tubes (suppliers send gift wrap in tubes sometimes and i’d kept them!) and as I only had a small amount of straw which I’d already used to pack the feet etc, I then resorted to old bits of tissue paper made watertight in cello bags that again, I’d saved to reuse. Straw is of course though the traditional route but well, we already had things so again, didn’t spend money and instead…just recycled what we had!
Body…
As I said hubby made this from bits of left over wood and tubing we already had! Genius! I love we now can use it again and it can sit, stand, lay etc so we have choice and we won’t need to spend time on it again but a simple, easy to make T frame in wood would work if you are creating a character that is stood up.
On to ‘Alfie’ the tortoise from Esio Trot…
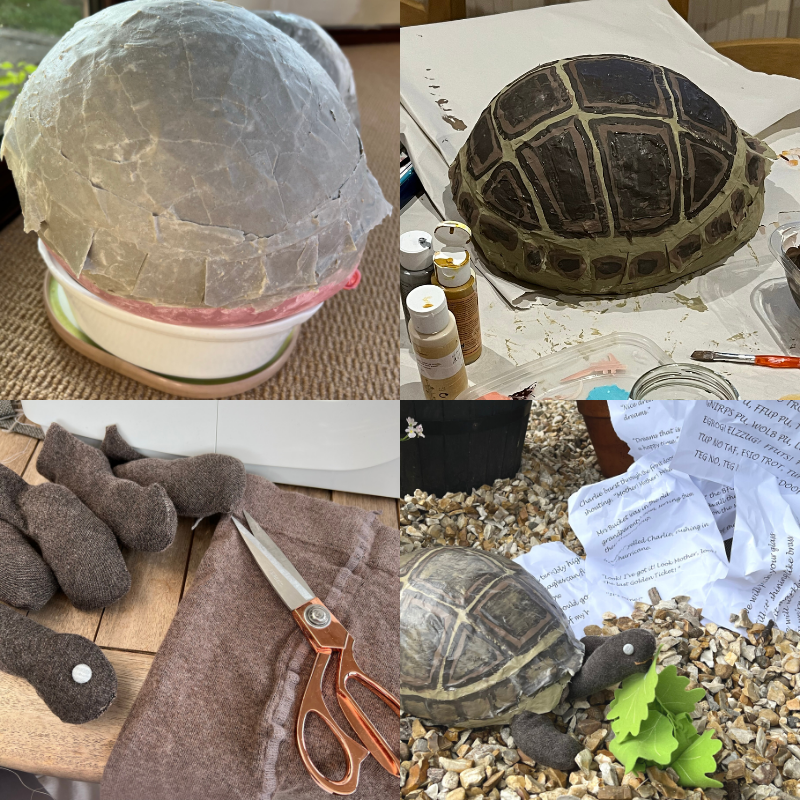
He may not be perfect, entirely accurate in his markings or the best but well, I was time bound so it was the quickest I could do and we rather like him…so did the little ones that did the trail, including our grand babies , they were quite intrigued and liked to pat or stroke him and the dog didn’t try to eat him or anything so we call that a success!
His body is made from cutting up a pair of thick thermal tights I didn’t even know I’d kept until I was searching for something to use and which I found was an ideal colour inside out so I reversed them. I simply then made a paper template of what I thought I needed for limbs and head and sewed these on a sewing machine, stuffed with old bits of material and wadding, bent several pieces of wire around and popped in the head part so it would stay upright and I could move it to any way I wanted once it was attached. The body (underneath) was the top part of the tights filled with a bag of sand and padding around it) with velco sewn on the top to attach to the shell (made from papier mache and painted then varnished like the head) which also had some velcro in that was hot glued. this mean that it would not fly away in the wind as it was attached to the underneath which of course was weighted down with the sand!
And some of the other bits…
- The paper bunting was laminated so can be reused.
- The glass jar was filled with shredded tissue paper, battery lights inside and hot glued down to the wood shelf hubby created from left over planks in the garden.
- The newt was a toy from the playroom sat in a plastic pint pot glass full of water but to stop it blowing away, was then sat in another pint pot which was hot glued down!
- The sweets were made from either recycled card and painted with acrylics then weatherproofed with varnish or made from left over bits of cello and tissue.
- The sign was an old piece of wood from a unit we had recently taken down whilst updating the kitchen, so we we painted and varnished it but note…it had a sheen so the paint so didn’t go on very well…next time we’d either prime it or use raw wood!
- The paper coming out the bin was simply sprayed with acrylic clear car spray paint left over from another project years ago then hot glued together and weighted down with gravel…And yes it quite unbelievably held up in little showers and the wind!
- The book…Fairy soap powder boxes covered in left over creased wrapping paper and printed paper…Then a mix of sticky back plastic, sticky tape and varnish to weatherproof!
We so hope you’ve found it interesting and that you’ll visit a scarecrow trail if you ever have the chance and if you are thinking of having a go please do! You don’t have to go to the lengths we have and the joy it gives people is wonderful.
Will we be doing it again? You bet we will! Do follow/like us on instagram or facebook to keep up with our antics and please do tag us in on what you get up to if you do one!
Please note: If you are attempting to make a scarecrow please be careful using the equipment especially if you are carving things out …Any reference to any materials are just our own ideas and not an endorsement and we cannot take any responsibility for any issues in you using them. We would recommend doing your own research on safety measures and reading up and adhering to the manufacturers instructions when working with any paints, glues/solvents and sharp equipment etc.
No Comments